Three Tips for Designing Wireless Network
I will never design bad Wi-Fi. This sentence is a marketing slogan of one of the wireless design tools. Marketing aside, it represents an important truth about the Wi-Fi life cycle, the Design.
Designing Wi-Fi network is the phase during which you decide where to locate the access points in the area, which antennas to use and the installation height. On the operational side, each access point will transmit data on a specific frequency and transmit power in order that all access points operate with each other delivering high quality service for the Wi-Fi devices.
Having a good design with bad configuration is something that can be fixed remotely with minimum effort and expenses. At least that is the presumption.
Imagine the following scenario: predictive design has been done. All access points are up and running, but during the acceptance you realize that the signal is not as planned, resulting in unsatisfied customer. The design must be improved, it does not matter how. You might need to add more access point or even remove some. Either way unaccounted extra time, money and effort are to be invested.
During the short time I have spent working on Wi-Fi I found a lot of people publishing important and helpful tips for Wi-Fi design. In this article I am presenting my three golden rules.
scale the map correctly: map scaling is the very first step to be done while designing Wi-Fi, the scale will allow the designing program to calculate how far the signal travels. The importance of correct map scaling has been mentioned over and over, but it is worth mentioning again. Wi-Fi design programs rely on calculating the attenuation of obstacles in the space (walls, pillars, elevator...) but before that, it relays on free space path loss calculation, meaning that even if you are designing Wi-Fi for obstacles-free hall, the Wi-Fi signal strength will reduce while propagating through the air. To reduce the margin of error when scaling the map, always measure the longest line and scale twice (horizontal and vertical) when possible.
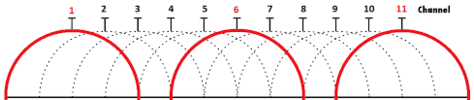
Obstacle’s utilization: As signals moves through the air, access points might interfere with each other making channel planning more challenging. Especially in 2.4 GHz which has only three non-overlapping channels 1, 6 and 11 as exemplified below.
One approach to minimize interference from our own access points and control the coverage cell size is using the existing objects in the area (walls, pillars, etc.) and area separations to our advantage.
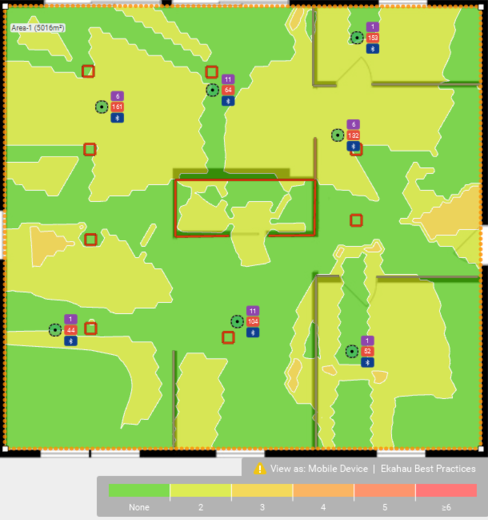
The example below shows a simple floor plan with an amount of access point necessary to provide coverage. Using this installation introduces more channel interference as most of the access points are in the line of sight facing each other.
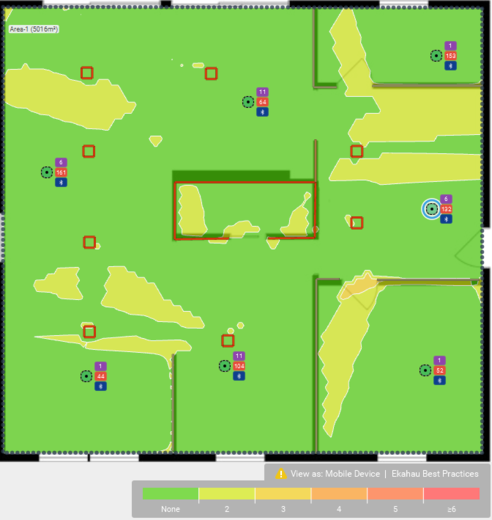
a valid way to fix this is installing the access points as shown on the map below. The access points are positioned in a way that they are separated by walls or pillars improving the coverage and reducing the channel interference.
3. Choose the correct material when drawing objects: During the signal movement through an object, it attenuates and that plays a big role in Wi-Fi design. But how material selection can affect?
Think of designing Wi-Fi in an office area and using the wrong material of walls, with RF attenuation value less than 5 dB from the reality. How will the signal be after installation? Well as the access points start operating, the signal will propagate in the air and through the real walls, hence, 5dB higher from the walls chosen in the design. The signal in this case will attenuate more than what was planned, which will cause coverage holes. These coverage holes are detected by the wireless LAN controller, and as a correction, the RRM (Radio Resource Management) will increase the transmit power of access points to cover the holes. By increasing the power, the holes probably would be covered but on the other side the channel interference might increase.
You can think of the RRM role as a meeting room moderator ask people to speak louder or quieter in order that all participants understand each other.
A lot of materials are already included in Wi-Fi design programs’ library, if you are not sure what to use, take the safe side, calculate the attenuation by yourself and define a new material. (Which I will be talking about in another blog)
It is challenging to have a design with zero error, especially in a variable environment (warehouses, industry areas.) so it is worth putting more effort on defining worst case scenarios and design based on that.
